


This configuration procedure for call recording on Cisco Unified Communication Manager (CUCM) platform with phones that have Built-in-Bridge (BiB) capability requires two separate steps
1. Set up Built in Bridge Recording
2. Set up TAPI Service
BUILT In Bridge Recording
1. Create a SIP profile for the recorder
a. In the CUCM Administration select the Device > Device Settings > SIP Profile menu option in order to create a SIP profile.
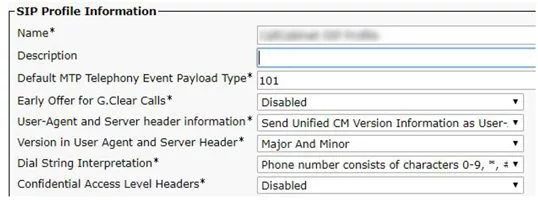
- i. Enter a name in the SIP Profile Information.
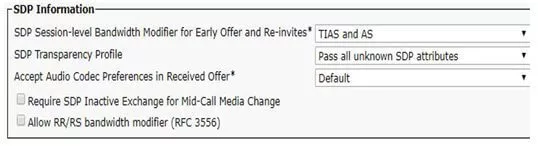
- ii. Set the SDP Information as follows:
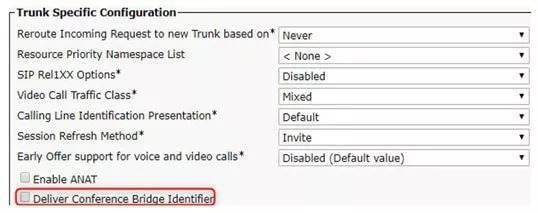
- iii. The Deliver Conference Bridge Identifier option is not required for recording. If this option is enabled will allow the recorder to get the far-end number information that identifies a conference bridge.
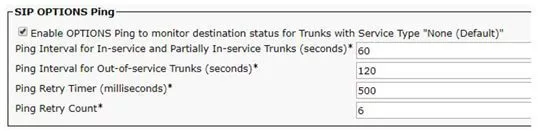
- iv. Enable “OPTIONSPing” to monitor only if you are running in a multiple server setup, otherwise leave the option unchecked.
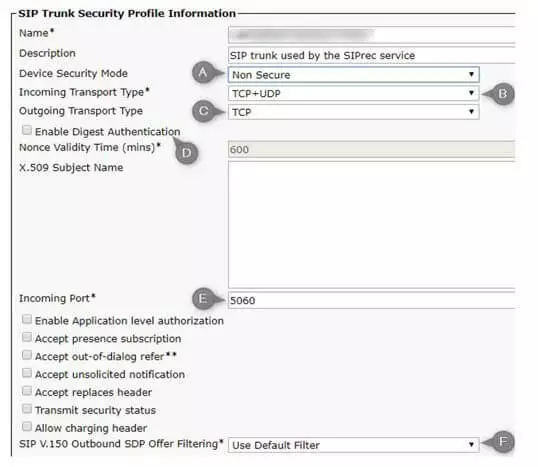
2. Create a SIP trunk security profile
a. In the CUCM Administration select System > Security > SIP Trunk Security Profile menu option to create a SIP Trunk for the Recording Server.
- i. Set Device Security Mode parameter to Non Secure.
ii. Set Incoming Transport Type to TCP+UDP.
iii. Set Outgoing Transport Type to TCP.
iv. Make sure the option Enable Digest Authentication is unchecked.
v. Set the Incoming Port.
vi. Select default filter on Outbound SDP offer filter.
3. SIP trunk to Recorder configuration
a. Go to Device > Trunk menu option in CUCM Administration to create a SIP trunk that will point to the recorder.
- i. Set the name of the trunk in the Device Name section
ii. The Media Termination Point Required checkbox has to be unchecked.
iii. Make sure that the checkbox Run On All Active Unified CM Nodes is selected.
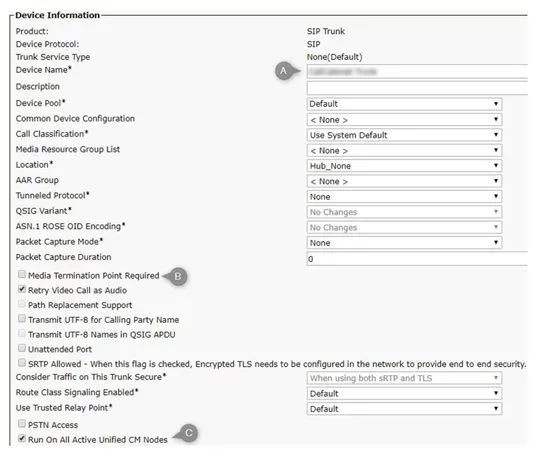
- iv. Set the SIP Privacy option to None.

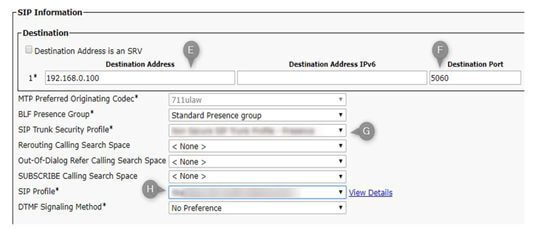
b. Edit the SIP Information as follow.
- i. Set the Destination Address to the ip-address or domain name of the CallCabinet Recording server.
ii. Set the Destination Port to 5060.
iii. In the SIP Trunk Security Profile option select the previously created profile.
iv. In the SIP Profile option select the previously created profile.
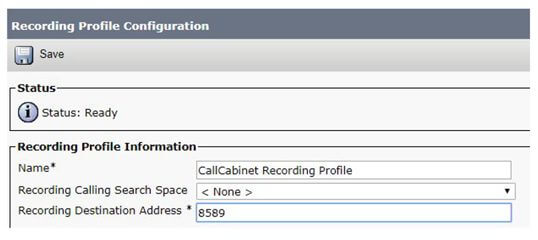
4. Create a recording profile
a. Go to Device > Device Settings > Recording Profile option in CUCM Administration.
- i. Set the Recording Calling Search Space to the Calling Search Space that you selected for the Recorder SIP Trunk.
ii. Set the Recording Destination Address to a number that associates the recorder with this recording profile. Make sure that the number is not being used .i.e 8589.
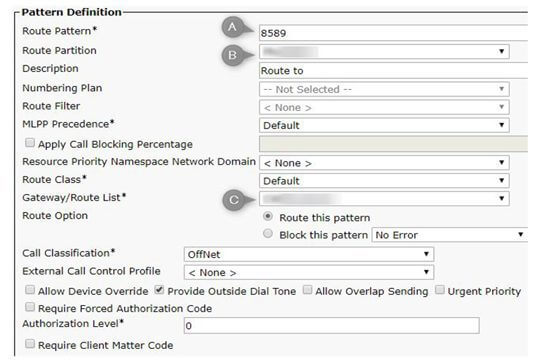
5. Create a route pattern for the recorder
a. Go to Call Routing > Route/Hunt > Route Pattern option in CUCM Administration and create the route pattern for the recorder SIP trunk
- i. Route Pattern must match to the number you set in the Recording Destination Address .i.e (8589)
ii. Set Route Partition to the partition that includes the user phones.
iii. Select the SIP trunk that points to the announcement player in the Gateway/Route List.
6. Enable Built-in-Bridge(System or Phone level)
a. To enable BiB at system level Go to System > Service Parameters option in CUCM Administration.
- i. Select your CUCM server from Server list
ii. Select Cisco CallManager (Active) from Service list.

b. Set Clusterwide Parameters (Device – Phone) > Builtin Bridge Enable to On.

c. To enable BiB on per phone Device > Phone option in CUCM Administration.
- i. Set Built-in-Bridge option to On.

7. Disable 256kpbs wideband codec
a. Go to System > Region option in CUCM Administration.
- i. Enter the Name in the Region Information.
ii. In the Region Relationships section change per-region setting Max Audio Bit Rate to Use System Default or 64 kbps (G.722, G.711).

8. Recording of conference calls
a. Go to System > Service Parameters option in CUCM Administration.
- i. Change the setting G.722 Codec Enabled to Enabled for All Devices Except Recording-Enabled Devices.

9. Enable recording (Line appearance)
a. Go to Device > Phone menu in CUCM Administration.
- i. To enable recording of an agent, set the Recording Option to Automatic Call Recording Enabled.
ii. Set the Recording Profile to the previously created recording profile (see section 4).

10. Multi Server Recorder Configuration
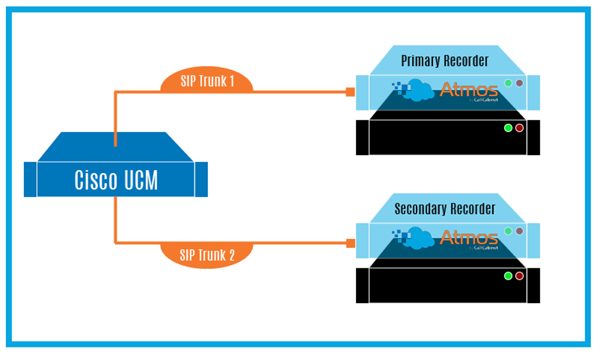
Each recording server in Cisco UCM is configured as a separate SIP Trunk. Cisco UCM will failover automatically from the primary recording server to the secondary in case of failure.
Create another SIP Trunk
Refer to SIP trunk to Recorder configuration to create the 2nd Trunk.
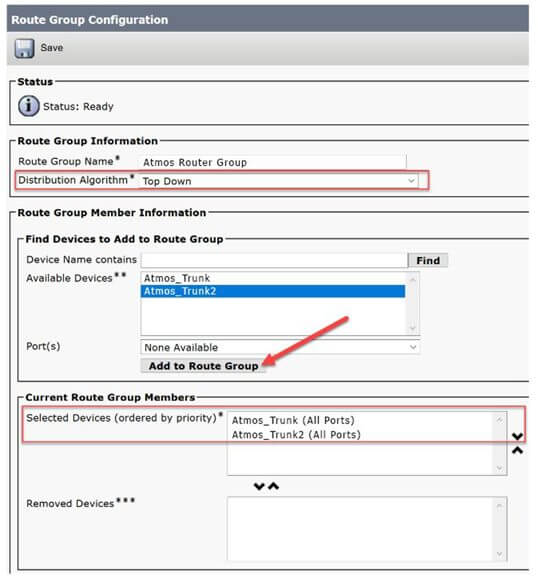
Create a new Route Group
Use the Call Routing > Route/Hunt > Route Group menu option in Cisco Unified Communications Manager Administration to create a route group for the CallCabinet SIP trunk:
Assign the previously created SIP trunk(s) to this route group at the Find Device to Add to Route Group panel. Select the desired SIP trunk(s) and click on the Add to Route Group button.
Set the Distribution Algorithm setting to Top Down.
Note: the Circular algorithm is not suitable for call recording SIP Trunk because it causes CUCM to send one side of audio one recorder and another side to another recorder (during playback, you will hear one side of conversation).
Create a new route list
Select Call Routing > Route/Hunt > Route List menu item and click on the Add New button.
- Select the appropriate Cisco Unified Communications Manager Group and click on the Save button.
- Click on the Add Route Group button at the Route List Member Information panel.
- Select the previously created route group at the Route Group setting, then click Save.
- At the Route List Configuration page click on the Save button.
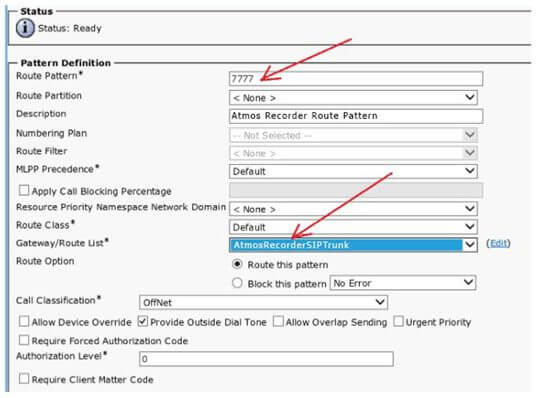
Create a new route pattern
Route Pattern should match to the Recording Destination Address in the previously created recording profile:
- Set Route partition to the partition that includes the user phones.
- In Gateway/Route List select the route list of which the recorder is a member.
Configure TAPI Services
1. Create a TAPI user in Cisco UCM Admin portal.
- In your CUCM Administration web portal .
- Go to User Management > Application User.
- Click the Add New button to create a new user account.

- Specify the username and password

- In the list Available Devices, select the devices which will be monitored by the recorder.
- Add the devices into the Controlled Devices list by clicking on the down arrow.

- In the section “Permissions Information”, click the Add to Access Control Group button.

- In the pop-up window select the following required options
- Click on Add Selected button.

- Check the “Permission Information”.
- Save the settings for the Application User.
2. Download the Cisco TAPI Service Provider Driver(TSP)
- On your CUCM Administration portal.
- Go to Application > Plugins.
- Filter by Name > begins with > Cisco TAPI > Plugin Type equals > Installation > Click Find.
- Click the Download link on either Cisco TAPI 32-bit Client or Cisco TAPI 64-bit Client depending on your OS architecture.

3. Install Cisco TAPI on the CallCabinet recorder
- On the CallCabinet recorder server.
- Execute the CiscoTSP.exe or CiscoTSPx64.exe installer.
- Set the number of CUCM instances. (at least 1).
- Specify the destination folder if needed and click next.

- Enter the credentials of the Application User previously created.

- Enter the CTIManager settings and click next.
- Finish the installation and restart the recorder server.

Note: If the required information is not known at the moment of the installation, it can be set after by using the Cisco TSP Configuration application.
4. Modify Cisco TAPI configuration (Optional)
- Start the Cisco TSP Configuration application which was installed with Cisco TAPI driver.
- Click on Configure button.

- Select the User Tab and enter the credentials of the Application User previously created.

- Select the CTI Manager Tab and specify the ip address of the CTI.
- Click on Configure button.
5. How to enable trace logging on the Cisco TAPI driver (optional) .
- Start the Cisco TSP Configuration application which was installed with Cisco TAPI driver.
- Select Trace tab.
- Select On checkbox.
- Specify the File Size (default 1 MB) and the maximum number of Trace files. (Default 10).
- Specify the destination Trace files directory (Default C:\Temp).
- Set the Trace to Error (log Errors only) or Detailed (debug mode).
- Enable all Trace levels.
Verify that the Cisco TAPI configuration is working
- Use the Microsoft Windows Phone Dialer Application to verify that the Cisco TAPI has been installed and configured correctly.
- Start the dialer (Open a Run window and type dialer ).
- Choose Tools > Connect Using…
- Select one Cisco Line: in the Line dropdown menu.
- Click OK button.
- Enter a number to dial and a call should be placed.
- If the call is successful, the Cisco TAPI client is configured correctly
Troubleshooting Cisco TAPI
- Should you experience any problems during the setup process or if no lines appear in the line drop-down list on the dialer application, please check the following:
- Verify the Cisco TAPI configuration settings by opening the Cisco TSP Configuration application and check the configuration settings.
- Reboot the computer (CallCabinet recorder) to make sure all configurations settings have been installed and updated successfully.
- Make sure that there is a connection link between the Recorder and CUCM.
- Make sure that the CUCM CTI Manager is running.