


This document will take you through the installation and set up instructions to both install and configure the CallCabinet Teams recording policy and bot.
Prerequisites
- Access to Powershell ISE in Admin mode
- Microsoft Teams Powershell 5.1 or higher
- Admin permissions to your Microsoft Teams account
- Microsoft Azure account with active subscription.
Create the CallCabinet Teams Bot
Note, because this installation takes place in a browser, some of the page elements can be obscured if the browser window is too small. We recommend you maximize your browser window size before proceeding.
Register the Bot
1. Log into Azure using the same domain \ admin account that you use to administer Teams (Note: It is important that the bot resides within the same domain)
2. Search for and select “Azure Bot” from the Azure Marketplace
2.1. Complete “Azure Bot” required fields:
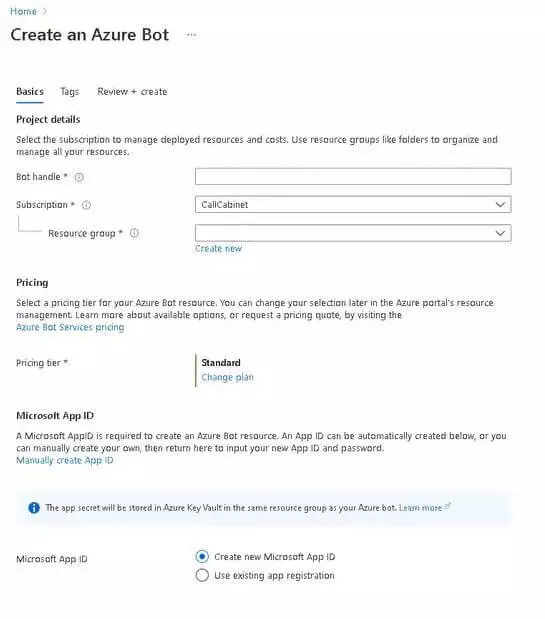
- 2.1.1. Under the “Basics” tab, add a unique Bot name (Bot handle) – “CallCabinetTeamsBot<customername>”
- 2.1.2. Select an existing Subscription
- 2.1.3. Select an existing “Resource group” or select the “Create new” hyperlink
- 2.1.4. Ensure that the Pricing Tier is set to “Standard”.
- 2.1.5. Select the “Single Tenant” option from the Microsoft App ID drop down
- 2.1.6. Under the “Review+create” tab, click Create
If the following error is shown, please review the Azure Bot configuration in the previous tabs
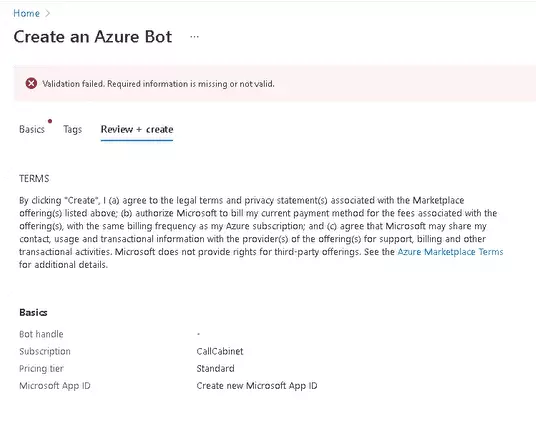
3. Click “Create”
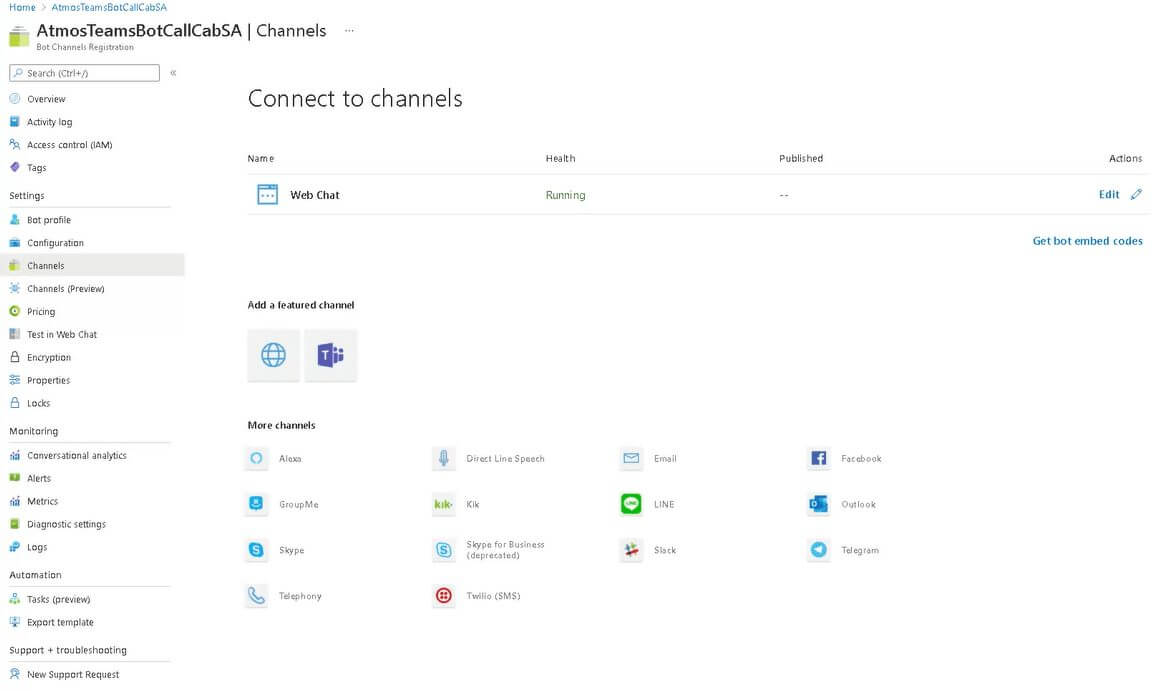
4. Once created, search for the Bot using the supplied Bot name and click on it.
5. Under Settings, select Channels from the left menu
6. Select the Teams channel (Teams icon)
6.1. Click “Calling”
6.2. Click “Enable calling”
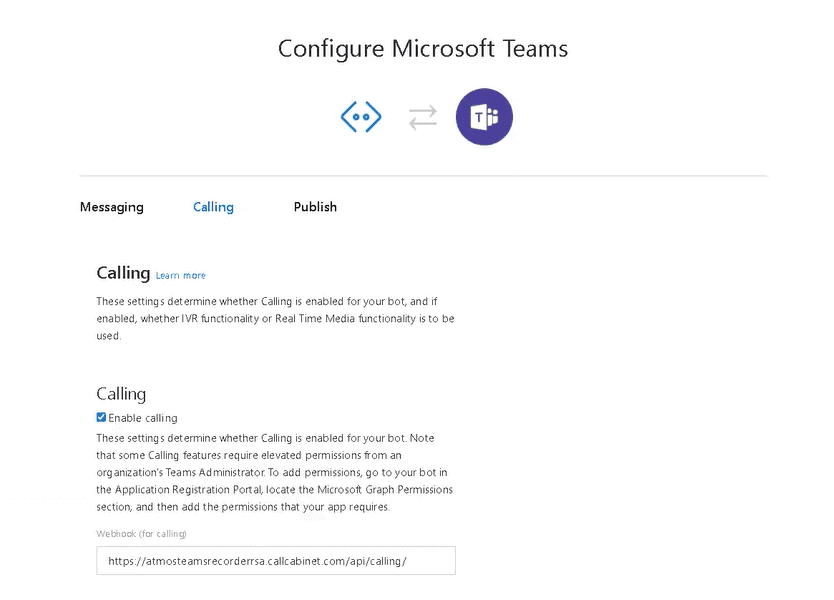
6.3. Select the appropriate regional Webhook URL
6.3.1 USA: Enter https://atmosteamsrecorder.callcabinet.com/api/calling/
6.3.2 USA #2: Enter https://atmosteamsrecorderus2.callcabinet.com/api/calling/ – Used with Redundant recording ONLY. Contact sales for more information and licensing.
6.3.3 UK: Enter https://atmosteamsrecorderuk.callcabinet.com/api/calling/
6.3.4 UK #2: Enter https://atmosteamsrecorderuk2.callcabinet.com/api/calling/ – Used with Redundant recording ONLY. Contact sales for more information and licensing.
6.3.5 RSA: https://atmosteamsrecorderrsa.callcabinet.com/api/calling/
6.3.6 SEA: https://atmosteamsrecordersea.callcabinet.com/api/calling/ – South East Asia
6.4. Click “Save” and accept the “Terms and Conditions”
7. Under Settings, click “Configuration” from the left menu
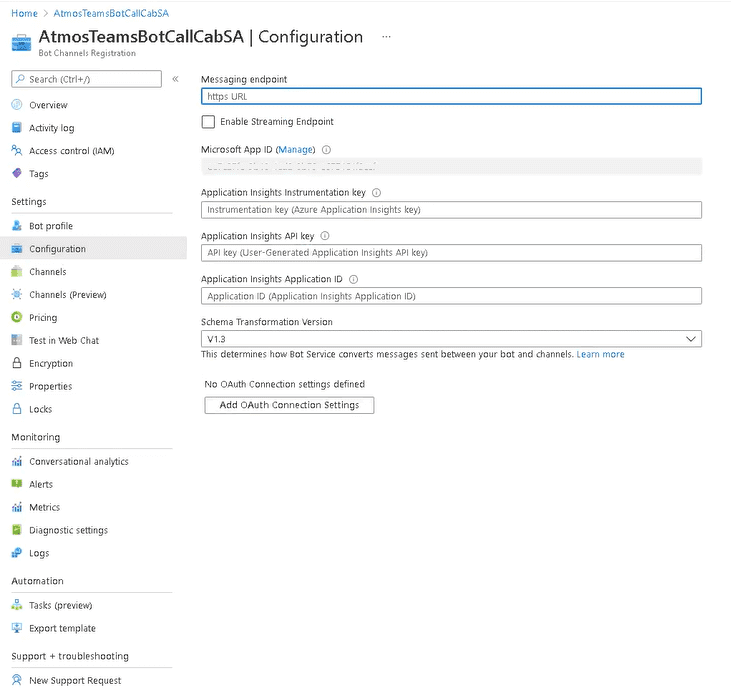
7.1. Click on the “Microsoft App ID” to make the text available, and then right-click it to copy it to your clipboard. You will need this shortly.
IMPORTANT: Save the Microsoft App ID in a separate document as you will need this later during the installation process.
7.2. Click the “Manage” hyperlink
8.1. Certificates & Secrets should automatically appear once the page is displayed, if not, under Settings, select Certificates & Secrets from the left menu
8.2. Add a “New Client Secret” under the Client Secrets heading
IMPORTANT: Save the Secret Key “value” in a separate document as you will need this later during the installation process.
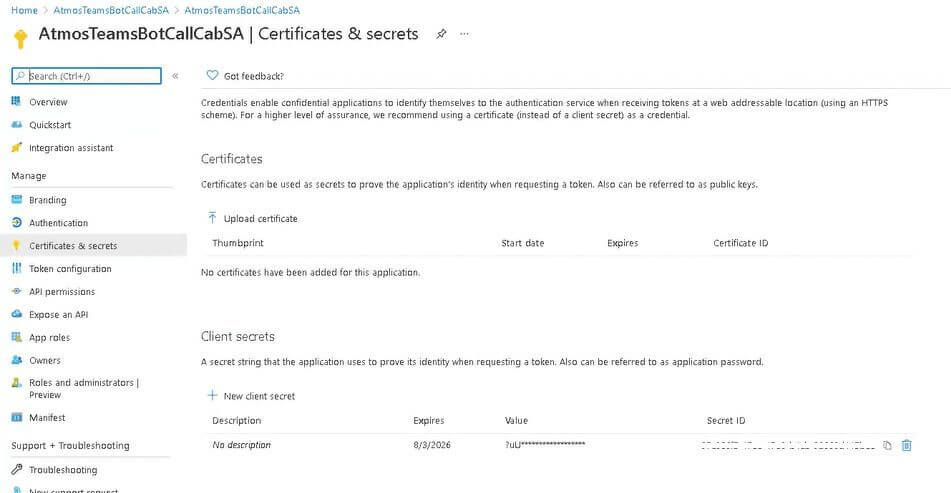
- 8.1. Give the Secret (password) a description, this will be used to secure traffic.
- 8.2. Select Expires -> 24 Months
- 8.3. Click “Add”
- 8.4. Copy the secret key value that is created into a document for later use. This secret value will be needed by the CallCabinet Teams Recorder VM / cloud service.
Note: This secret key value will not be available after save, so it MUST be saved to an external document you control.
9. Click “Authentication” on the left hand menu.

9.1. Click “+ Add a platform”
9.2. On the right hand pane under “Configure Platforms” click “Web”
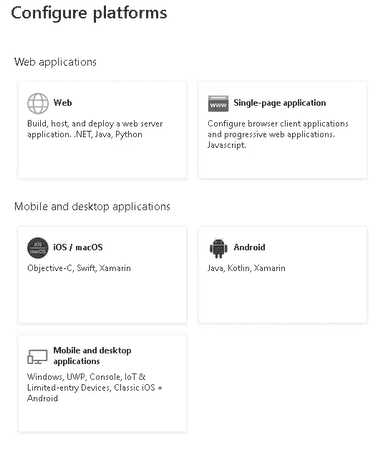
9.3

- 9.3.1. Enter “https://www.callcabinet.com” as the Redirect URI.
- 9.3.2. Click “Configure” on the bottom of this pane
9.4. Under Settings, select API Permissions from the left menu
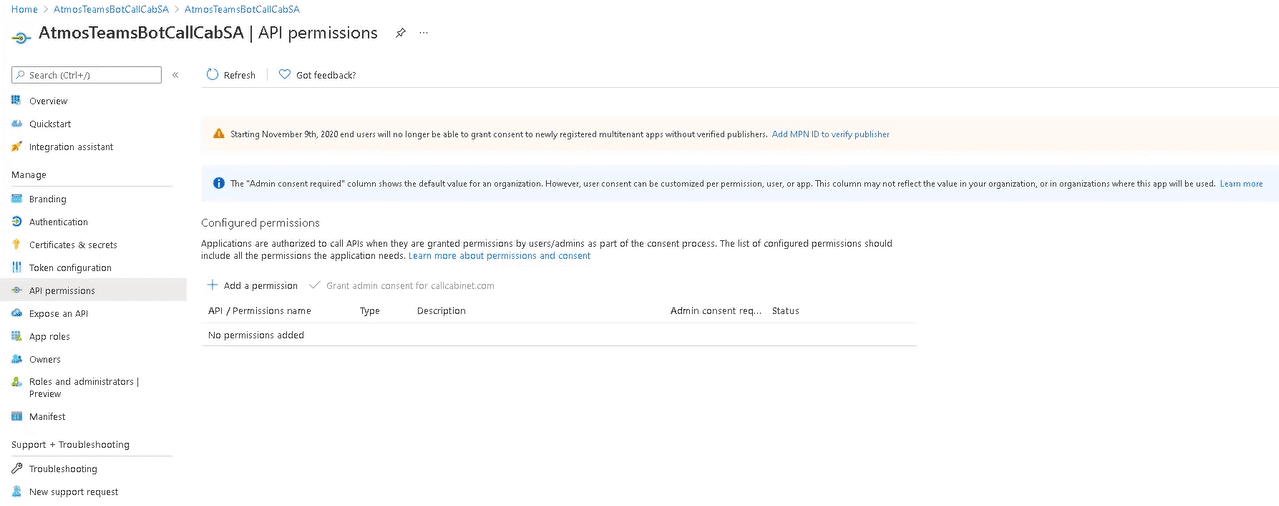
- 9.4.1. Click Add a permission
NOTE: If the left hand pane outputs an error, fully refresh your browser and try again. It may be necessary to wait 5 minutes and refresh again before you’re able to see the Microsoft Graph window.
- 9.4.2. Select “Microsoft Graph”

- 9.4.3. Select Application Permissions. This will expand the permissions menu.
- 9.4.3.1. Expand the “CallRecords” permission and click the checkbox as seen below.

9.4.3.2. Expand the “Calls” permission and click the checkboxes as seen below.

9.4.3.3. Expand the “OnlineMeetings” permission and click the checkboxes as seen below.

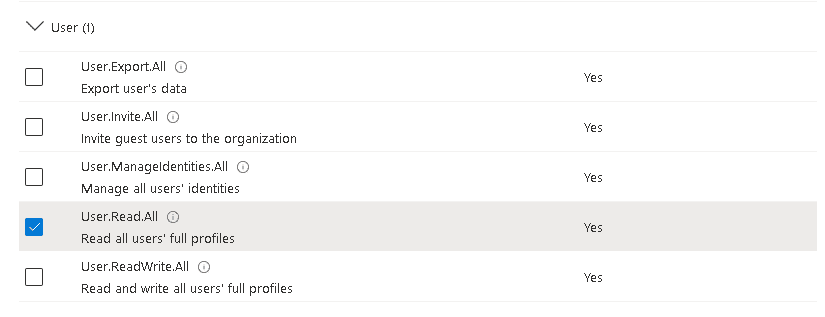
9.4.3.4. Expand the “User” permission and click only the checkboxes as seen below
9.4.3.5. Click “Add Permissions” to finalize permission configuration.
![]()
9.4.4. Grant Permissions

- 9.4.4.1. Ensure the API / Permission names match the previous step, then click “Grant admin consent for …”. You will be prompted to confirm the grant of admin consent. Click “Yes”. It may be necessary to refresh your screen to update the Microsoft Graph Status column.
- 9.4.5. Grant Admin consent
In order to grant admin consent you will need to construct an admin consent URL. It will help you to have a simple text application like notepad open for copying and pasting the text strings involved in the following steps. When you’re ready to continue:- 9.4.5.1. Go to the bot you just created and click “Overview”
- 9.4.5.2. Take note of the “Application (client) ID” and “Directory (tenant) ID”
- 9.4.5.3. Construct the following URL:
https://login.microsoftonline.com/Insert Directory (tenant)ID/adminconsent?client_id=Insert Application (client) ID&state=12345&redirect_uri=https://www.callcabinet.com
Example:
https://login.microsoftonline.com/31e4423fe-902d-485a-ac36-b5787123458/adminconsent?client_id=4ab901d0-7bbd-486f-8cec-233256335&state=12345&redirect_uri=https://www.callcabinet.com
Copy the URL to your browser’s address window and execute
Note, you may be required to log in to your Microsoft account
- 9.4.5.4. Accept the permissions, on successful execution you will be diverted to the Redirect URI you provided.

Set-up the CallCabinet VM / Cloud Application
This step will involve the assistance of the CallCabinet support team, when your bot is created please create a helpdesk ticket by clicking here, or simply reply to your existing support ticket, please supply the following information you collected during the CallCabinet Teams Bot creation process:
- The Bot Name (Bot handle)
- The Bot Microsoft App Id
- The Client Secret (secret key)
- The Directory Tenant ID
- The CallCabinet Customer and Site IDs (if available)
- Webhook used in section 6.3
Note: Continue with the instructions below once you have sent the above information to CallCabinet.
Setup the CallCabinet Teams Application and Recording Policy
Getting Started
Set up your Powershell session
Now you’ll tell Powershell what credentials to use when connecting to Microsoft Azure. This session doesn’t need to be run from your recording server as Powershell is built for remote operation. Be sure to use the latest version of Powershell as outdated versions may fail the process.
- Run Windows Powershell ISE as an administrator from a Windows PC \ Server.
- Install the latest Teams Powershell module by running
- Install-Module -Name MicrosoftTeams
- Update-Module MicrosoftTeams
- Import-Module MicrosoftTeams
- Connect-MicrosoftTeams
Login with your Microsoft Teams Admin Account

Create the CallCabinet Teams Application
- You will need to create a new Teams (Office 365) user (https://admin.microsoft.com/Adminportal/) to be used in the next step
- Run
New-CsOnlineApplicationInstance -UserPrincipalName 'callcabinetteamsbot@<your domain>' -DisplayName 'CallCabinet Bot App' -ApplicationId <Application ID> //The Bot Application ID that you created
- 3.Take note of the <ObjectID> that is returned
- 4.Sync the Application Instance
Sync-CsOnlineApplicationInstance -ObjectId <objectId>
- 5.Confirm the App and IDs
get-CsOnlineApplicationInstance
Create the Compliance Recording Policy
New-CsTeamsComplianceRecordingPolicy -Enabled $true -Description "CallCabinetTeamsRecordingPolicy" -Identity "CallCabinetTeamsRecordingPolicy"
Note: Ignore the error “WARNING: Length of the Compliance Recording Application list should be non zero.”
You can confirm the policy by running
Get-CsTeamsComplianceRecordingPolicy
Set the Compliance Recording Policy to the CallCabinet Teams application
Set-CsTeamsComplianceRecordingPolicy -Identity 'CallCabinetTeamsRecordingPolicy' -ComplianceRecordingApplications @(New-CsTeamsComplianceRecordingApplication -Parent 'CallCabinetTeamsRecordingPolicy' -Id '<objectId>')
NOTE: Use Get-CsTeamsComplianceRecordingPolicy to return the correct Policy name and Object ID
NOTE: The default policy requires the recording server to respond to each request, if the recording server were ever unresponsive Teams will not allow the call to connect (Assuming there is no resilient BOT). This behaviour can be changed by setting the required parameters. See Example below.
Set-CsTeamsComplianceRecordingApplication -Identity ‘Tag:CallCabinetTeamsRecordingPolicy/<Object ID>' -RequiredBeforeCallEstablishment $false -RequiredDuringCall $false -RequiredBeforeMeetingJoin $false -RequiredDuringMeeting $false
NOTE: Use Get-CsTeamsComplianceRecordingApplication to return the correct tag.
We now need to grant the recording policy to a Group (Recommended), User or to the entire Company. User and Company configuration options moved to the Additional Configuration Options page.
NOTE: Adding / Removing users from an Azure Security Group may take up to 48hrs to take effect due to Azure synchronization limitations.
Group Recording Policy Assignment steps:
In Azure Active Directory go to Groups and create a Recording group. Use the Object ID of the Group in the Powershell command below. Assign a single “Test” user to ensure the policy is working as expected before adding all recorded users to the group.
New-CsGroupPolicyAssignment -GroupId ObjectID -PolicyType TeamsComplianceRecordingPolicy -PolicyName CallCabinetTeamsRecordingPolicy -Rank 1
Get Group Policy – Verify if group policy was assigned correctly
Get-CsGroupPolicyAssignment -PolicyType TeamsComplianceRecordingPolicy
Sync the Application Instance to confirm all changes are applied.
Sync-CsOnlineApplicationInstance -ObjectId <objectId>
Note: Use the ObjectID of the application instance.
Recording Resiliency (Optional – Contact Sales for details)
- Create a new bot and define a new name
- Create a 2nd application instance for the new BOT
New-CsOnlineApplicationInstance -UserPrincipalName ‘CallCabinetteamsbot@<your domain>’ -DisplayName ‘CallCabinet Bot App’ -ApplicationId <Application ID> //The Bot Application ID that you created
- 3.For 2N Redundant Recording
Set-CsTeamsComplianceRecordingApplication -Identity ‘Tag:CallCabinetTeamsRecordingPolicy/<Object ID>’ -ComplianceRecordingPairedApplications @(New-CsTeamsComplianceRecordingPairedApplication -Id ‘<Object ID of 2nd Application Instance>’)
- 4.Sync the Application Instances to confirm all changes are applied.
Sync-CsOnlineApplicationInstance -ObjectId <Object ID of 1st Application Instance>
Sync-CsOnlineApplicationInstance -ObjectId <Object ID of 2nd Application Instance>
Additional Configuration Options (Optional)
It is recommended to assign the recording policy to a group; however, assigning the policy to a User(s) or Company rather than a group is an option.
Grant Recording Policy to Everyone:
Grant-CsTeamsComplianceRecordingPolicy -PolicyName $PolicyName -Global
Grant Recording Policy to a user(s):
Grant-CsTeamsComplianceRecordingPolicy -Identity <user to be targeted> -PolicyName ‘CallCabinetTeamsRecordingPolicy’ -Tenant ‘<tenantID>’
To Remove a policy that has been granted:
Grant-CsTeamsComplianceRecordingPolicy -Identity <user to be removed from policy> -PolicyName:$Null -Tenant ‘<tenantID>’
Confirm the recording policy
Get-CsOnlineUser | Where-Object {$_.TeamsComplianceRecordingPolicy -eq ‘CallCabinetTeamsRecordingPolicy’} | Select UserPrincipalName
Troubleshooting
The CallCabinet Bot
- Ensure that the CallCabinet Bot is successfully authorized by logging into your Azure Portal, locating the Bot.
- Under Settings, click Configuration from the left menu -> Manage hyperlink
- 3.Click on “API Permissions” and make sure that the permissions are all set to “Granted”.

The Teams Application and Policy
- Connect to Teams using PowerShell as described in the “Getting Started” section of “Setup the CallCabinet Teams Application and Policy”
- Ensure that the “ApplicationId” matches the App ID assigned to your Bot.

Confirm that the Application Instance exists:
get-CsOnlineApplicationInstance
This should return the following:
- Confirm that the “compliance Recording Policy” exists
Get-CsTeamsComplianceRecordingPolicy
Ensure that the Id value in the ComplianceRecordingApplications value matches the ID of your Teams Application Instance.
- 4. If multiple entries exist or if there is incorrect data, use the following command to remove the entries and re-create the policy using the instructions above:
Remove-CsTeamsComplianceRecordingPolicy -Identity ‘CallCabinet CallCabinet Policy’
- 5. Confirm the recording policy
Get-CsOnlineUser | Where-Object {$_.TeamsComplianceRecordingPolicy -eq ‘CallCabinetTeamsRecordingPolicy’} | Select UserPrincipalName
This should return the list of users that have been assigned to your recording policy
- 6. Finally, once you have confirmed and adjusted all settings, Sync the Application Instance
Sync-CsOnlineApplicationInstance -ObjectId <objectId>
- 7. Note: If calls are automatically forwarded to Voicemail, it means that the policy is set to record force recording and the cloud service \ vm is not responding to the incoming call invite and the call connection is therefore refused. Refer to troubleshooting the VM / cloud service.
The Teams VM / Cloud Service
Ensure that the VM endpoint that you configured in your Bot under Channels -> Microsoft Teams -> Calling is correct. The value MUST be one of the valid webhook listed under section 6.3.
For any additional information please visit www.callcabinet.com or email our support team today.